reading time: 8 min
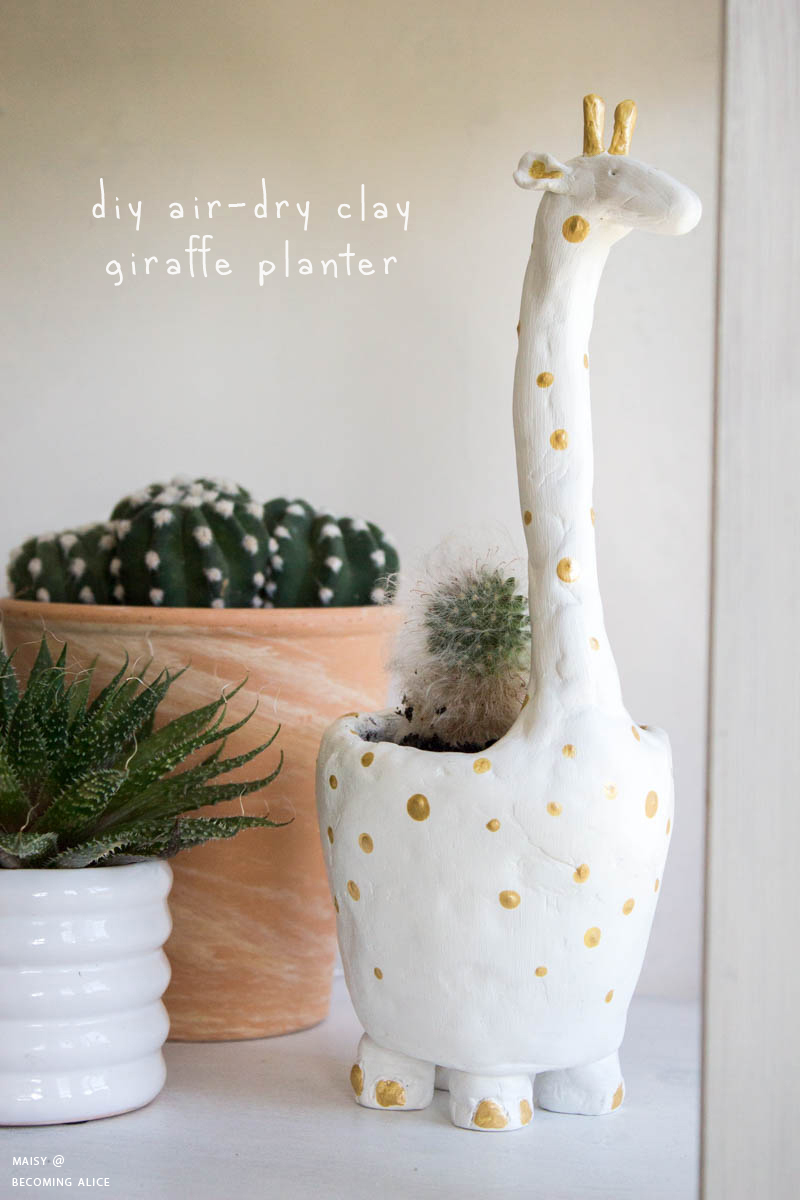
This cute DIY clay giraffe planter isn't only great for your own windowsill, but it would also be a perfect gift for someone who loves plants (especially succulents) and animals. Of course, you could also try another shape such as an elephant, a cat, a llama, a hedgehog, or whatever floats your boat. Heck, you could even create a whole fleet of animals and set up your own mini safari!
So on my 30th birthday last month I invited a couple of good friends over to eat homemade butternut squash soup and gluten-free apple cake, and to get creative with white air-dry modelling clay! We had loads of fun, making things like a doggie bowl, name tags, jewellery dishes, garlands, an ashtray, an incense holder, and tokens for a pen-and-paper role-playing game. It probably won't come as a surprise that one of my birthday gifts was a pottery course :)
The day after my birthday I used the leftover clay and used the tutorial on the German website Ella Mattsson as a guide to make this little DIY clay giraffe planter that is the perfect addition to any shelf or windowsill, or for a kid's room to hold your plants. It also makes for a great creative project with your kid. (I also learned during this project that there are nine different kinds of giraffes, the most common in zoos being the Somali giraffe and the Rothschild's giraffe, and the largest being the Masai giraffe that has super cool jagged, star-like blotches on its body.)
For this giraffe planter you don't need a wheel or any special pottery tools, and you also don't need a kiln!
For this giraffe planter you don't need a wheel or any special pottery tools, and you also don't need a kiln!
Basically, all you need is some air-hardening modelling clay (think of it as playdough for adults), an empty container as the base for your planter, and your hands. Full disclosure: This was the first time I ever worked with modelling clay!! So if I can do it, so can you! :)
Air dry clay is a natural clay that dries into a hard solid when exposed to air. There is no baking or firing needed and once it becomes dry, you can paint and decorate the clay. Since air-hardening clay is water-based, it is also very easy to clean up this kind of clay.
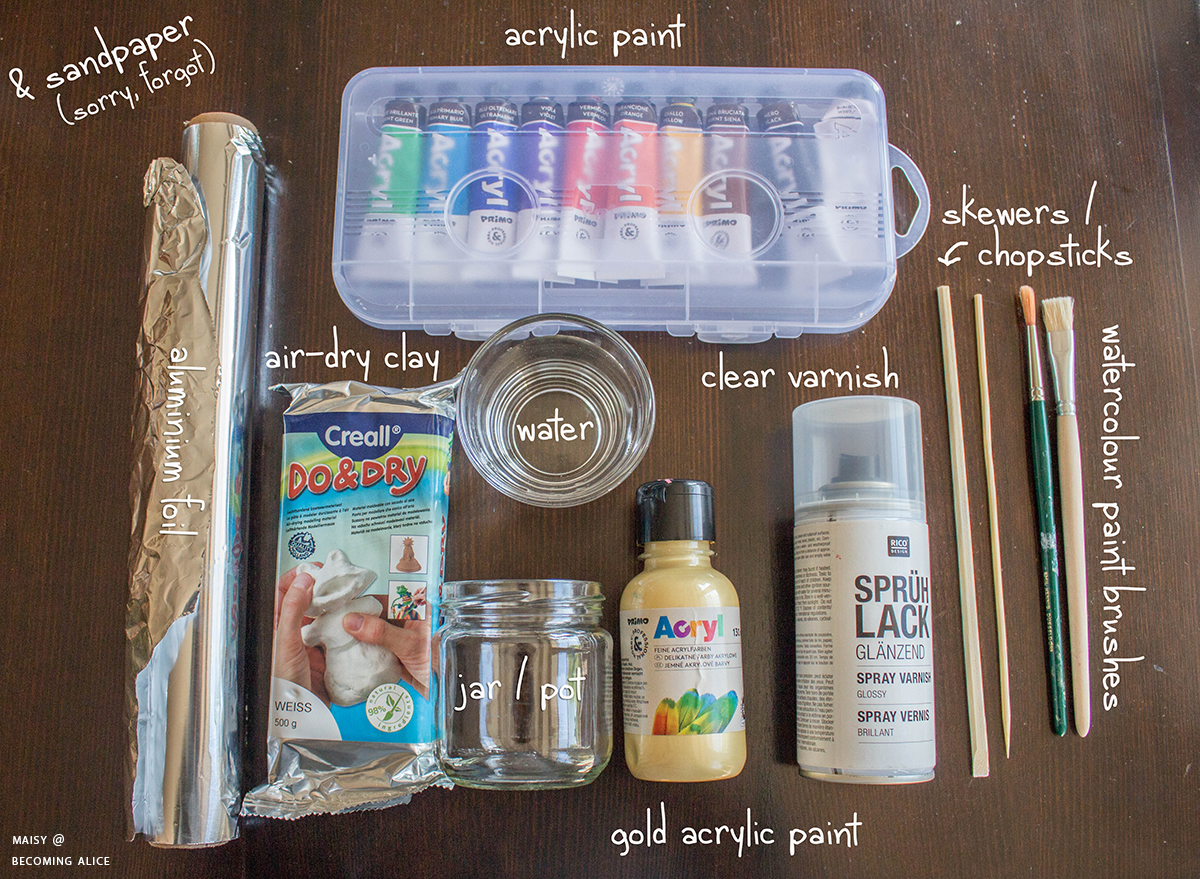
YOU WILL NEED:
- 500 g white air-hardening modelling clay (I used the Do&Dry air dry clay by Creall)
- 1 small plant pot or glass jar
- aluminium foil
- a toothpick or skewer
- a rolling board or clean tabletop
- fine sandpaper
- a small bowl with water
- clear varnish (I used clear glossy spray varnish)
- optional: white and gold acrylic paint
- optional: watercolour paint brush
- optional: rolling pin
HOW TO MAKE THIS CLAY GIRAFFE PLANTER:
Step 1 – Prepare
Clean your plant pot or jar to remove any dirt or oils, if needed. (As you can see in the pictures below, I was too lazy to do that, haha!)
Lay a rolling board on a smooth, sturdy table. Or just work on the tabletop, like I did. Just make sure you have a clean surface to work with.
Have a small bowl of water nearby to help smooth out the surface and patch cracks.
Step 2 – Take Measurements
Measure the height and circumference of your plant pot or jar, and write the measurements down. This will serve as a rough guide of how much clay you will need in order to cover the entire container. Add about 1/2 inch to the height so that you'll be able to wrap the clay around the edge with an overlap.
Step 3 – Roll It Out
Take a large chunk of modelling clay, and roll it between your hands until soft. Place it on the rolling board / wax paper / tabletop, and use a rolling pin to roll the clay into a long oval about 1/4 to 1/2 inch thick, and about as large as your measurements. (Or just use your plant pot or jar as a rolling pin – that's what I did!)
Step 4 – Cover the Container
Wrap the rolled out clay around your container, wrapping it around the edge to hide the container. Make sure the clay also covers the bottom of your container.
Trim off any excess clay where it starts to overlap each other.
Use your fingers to adhere the edges together. Slightly wet your fingers and run them over any seams or bumps to seal them.
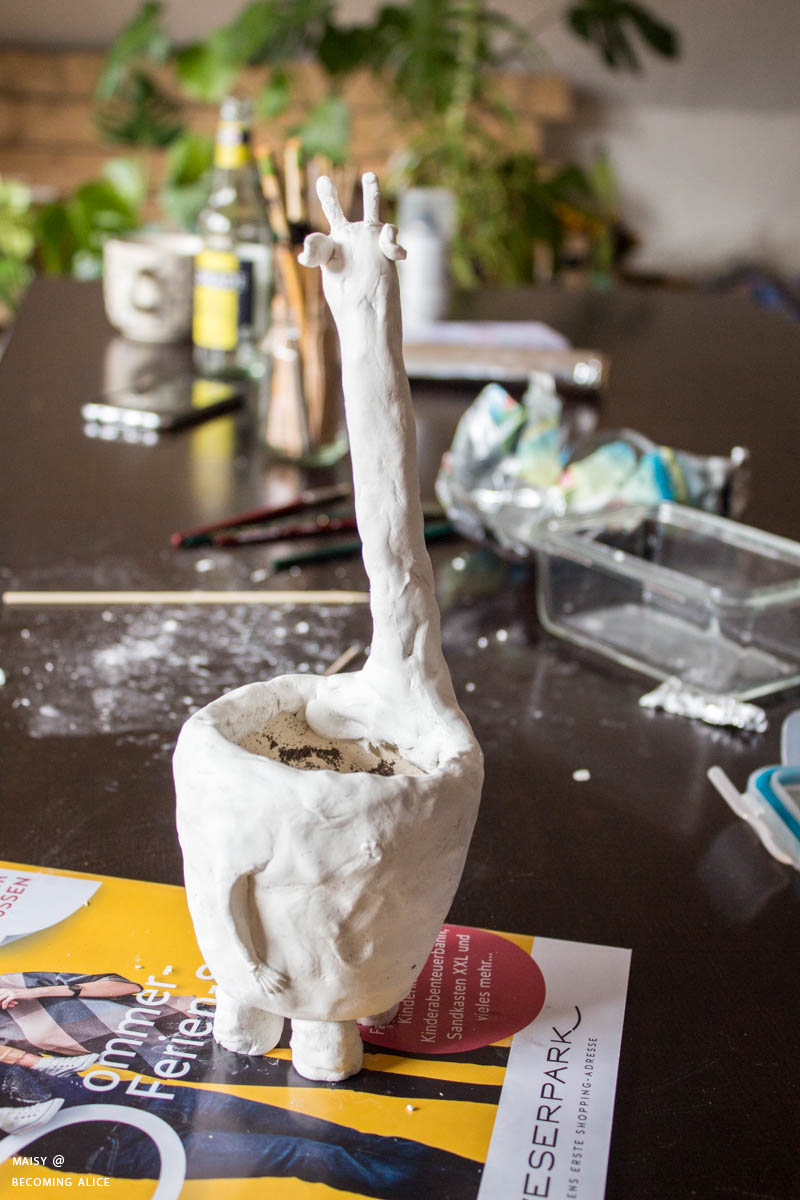
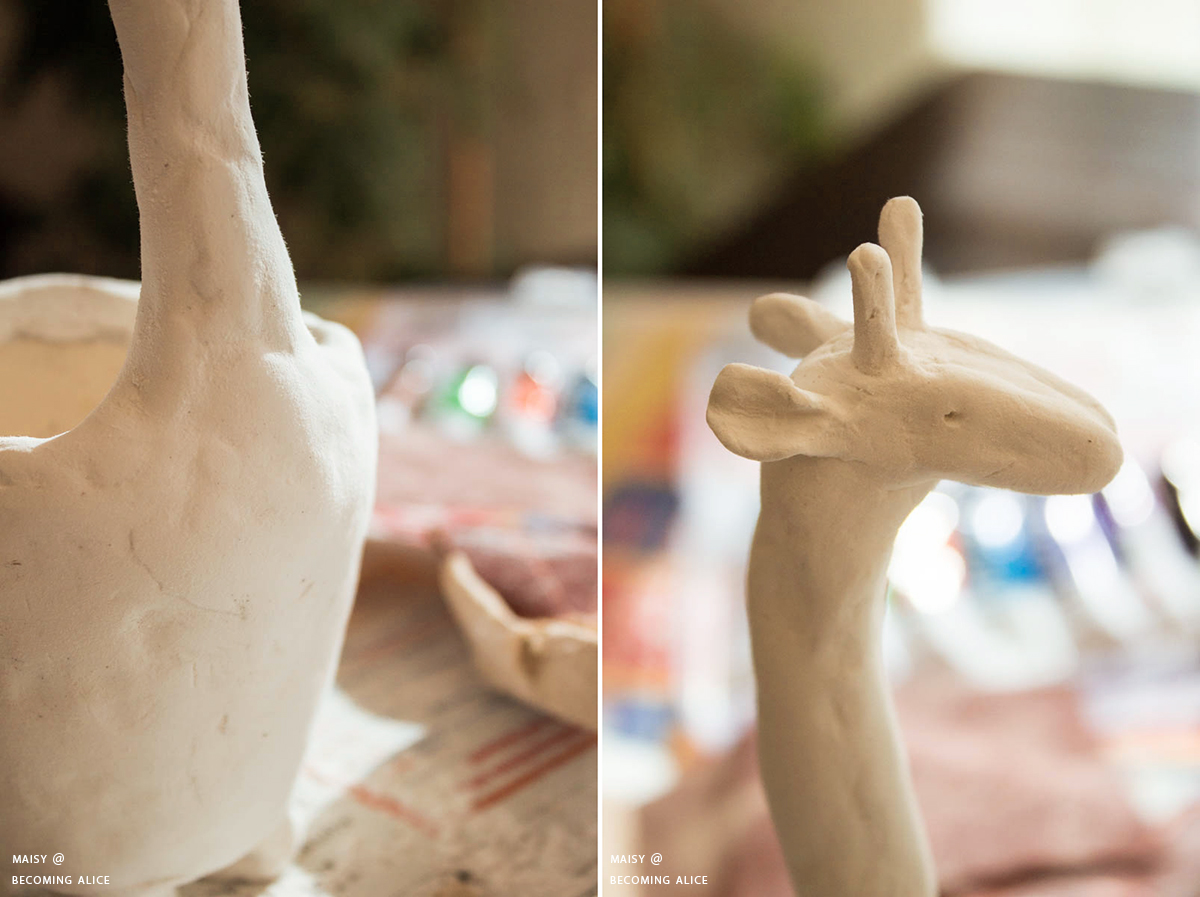
Step 5 – The Neck
Using a piece of aluminium foil, form the neck of the giraffe – so basically a long aluminium foil "sausage".
Take another chunk of modelling clay, knead it to soften it, roll it into a long flat roll, and wrap it around the aluminium foil.
Be very generous with the modelling clay here, otherwise the neck might break off! Use another piece of clay to attach the neck to the clay-covered container.
Don't forget to bend the upper end of the neck to form the giraffe's head. Pinch and pull the head to shape it how you want.
Step 6 – The Head
Take a toothpick, and cut off two small pieces. These will be used to stabilize the horns of the giraffe. Cover both horns with a bit of modelling clay, and carefully stick them into the head.
Make two teardrop-shaped ears out of some clay and attach them to the side of the head below the horns.
Use the other end of your remaining toothpick to poke two tiny holes into the clay for the eyes.
Step 7 – Tail and Legs
To make a tail, roll out a thin skinny piece of clay and press one end of it down to make a wider section. Attach the tail to the back of the clay-covered container. Use your toothpick to draw little slits into the wider section at the end of the tail to make hair texture.
Lastly, shape the legs. I simply rolled some clay into four grape-sized cones, cut an X on each of the surfaces to be joined, and gently pressed them to the bottom of the clay-covered container. Scoring the pieces will help them stick together much better, as does wetting your fingertips to connect the pieces.
Make sure the legs are the same height, otherwise your planter will tip over.
To further flesh out the hooves, I used my trusty toothpick once again, and incised two arches onto each leg to indicate the split hooves.
Step 8 – Smooth It Out
Using wet fingers, gently touch up any uneven spots or bumps. Since air-dry clay is water-based, wetting it will make it soft and creamy. This will a) make it easier to smooth the surface, and b) act as a "glue" when attaching a pieces of clay to another, like we did with the feet.
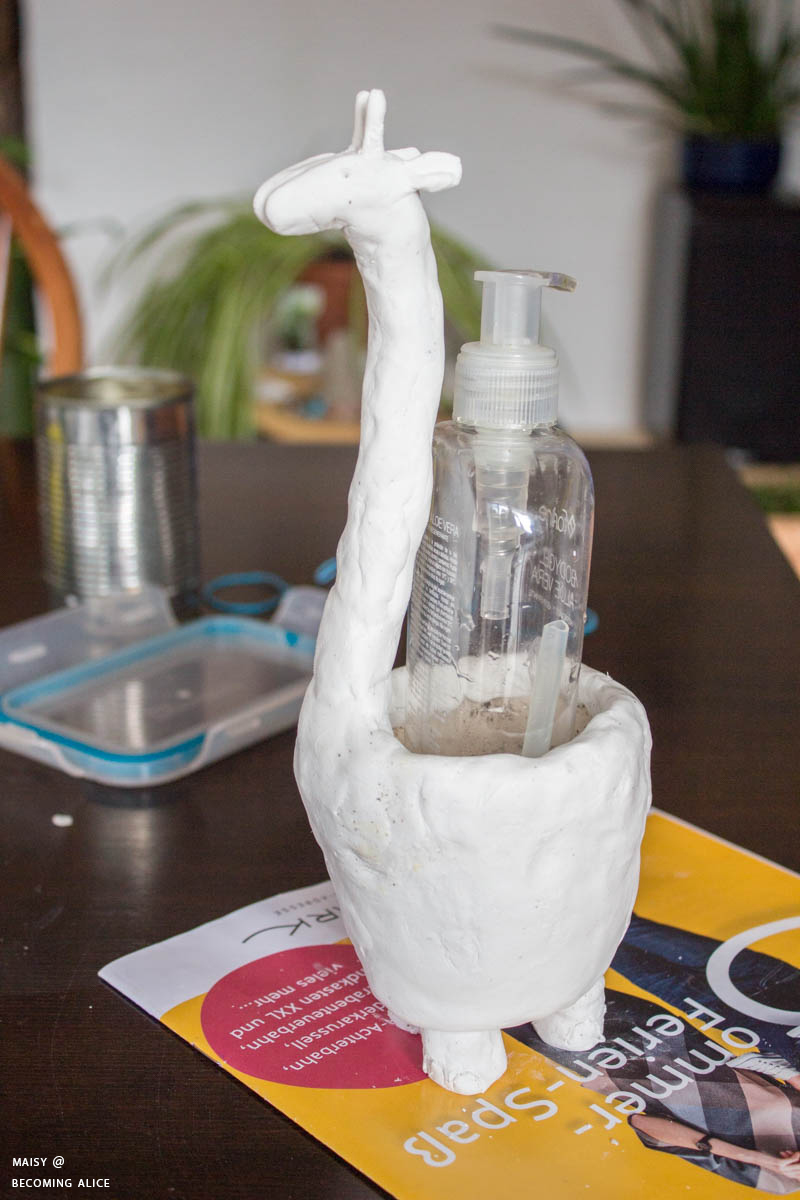
Step 9 – Allow to Dry
To dry, placed an empty bottle or something similar into the jar to prop up the neck (see picture above). That will prevent it from bending over or breaking off while the clay is still wet.
To dry, placed an empty bottle or something similar into the jar to prop up the neck (see picture above). That will prevent it from bending over or breaking off while the clay is still wet.
Keep your giraffe planter in a shaded and cool, undisturbed environment to air-dry entirely. The amount of time your clay needs to dry depends on how big and dense it is, from 14 hours to several days.
I placed my planter on a piece of newspaper to protect the surface underneath from getting stained.

Step 10 – Paint
Once the giraffe has completely air-hardened and is solid, I sanded the planter using a medium sandpaper (80 grit) as well as a fine sandpaper (100 grit) to smooth any uneven or rough spots. This is only possibly if the modelling clay is thick enough!
To follow up the sanding, coat all the surface with clean water and a soft watercolour brush. This will glue all the fluff and fibres from sanding (as seen on the left picture above) back to the surface.
This step is optional, but I would suggest painting your giraffe planter. I used white acrylic paint and a watercolour brush to evenly coat the entire giraffe, and then dabbed on different-sized dots of gold acrylic paint (using the round bottom end of my brush as well as the larger round bottom end of a chopstick) to indicate the coat pattern of the giraffe. I also painted the horns, the tuft of hair at the end of the tail and the hooves gold. Obviously, a giraffe's coat is usually tawny with brown patches, and not white and shimmery gold, and it certainly doesn't have round patches, but – artistic license, right?
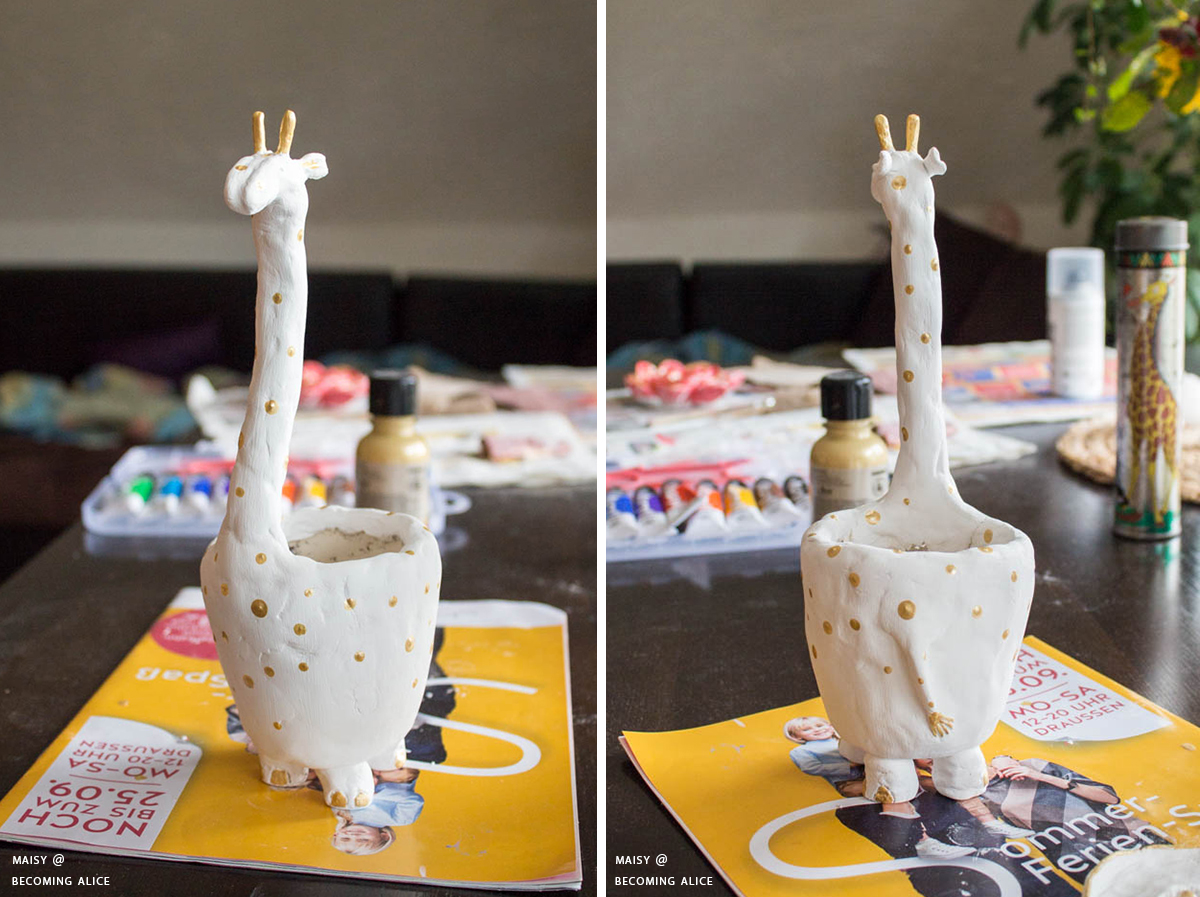
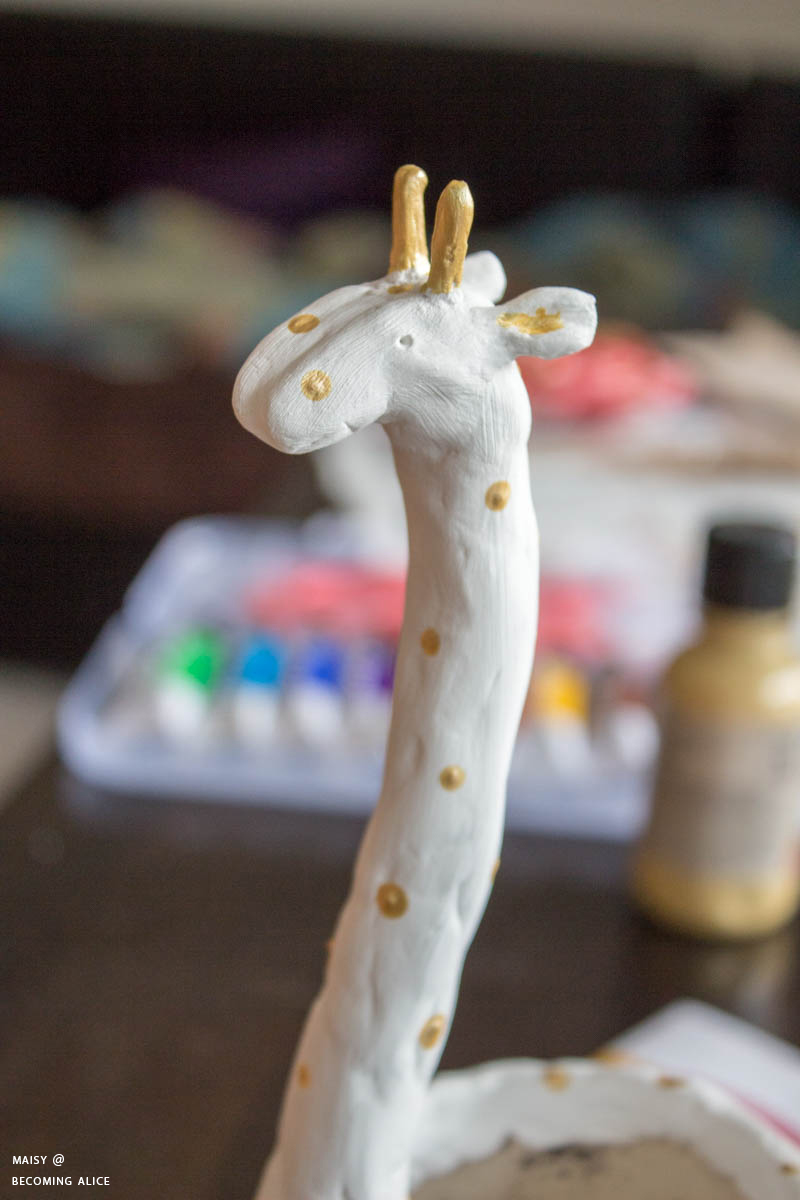
Finally, I sprayed my giraffe planter with clear glossy spray varnish to finish it off. This seals the acrylic paint, and it also makes it water-proof (depending on the varnish you use).
Make sure to let the paint dry before using the clay planter.
Grab your plant and place it into the body of the giraffe. Congratulations! You have made a beautiful giraffe planter. I hope you had fun!
I placed my planter on a piece of newspaper to protect the surface underneath from getting stained.
Step 10 – Paint
Once the giraffe has completely air-hardened and is solid, I sanded the planter using a medium sandpaper (80 grit) as well as a fine sandpaper (100 grit) to smooth any uneven or rough spots. This is only possibly if the modelling clay is thick enough!
To follow up the sanding, coat all the surface with clean water and a soft watercolour brush. This will glue all the fluff and fibres from sanding (as seen on the left picture above) back to the surface.
This step is optional, but I would suggest painting your giraffe planter. I used white acrylic paint and a watercolour brush to evenly coat the entire giraffe, and then dabbed on different-sized dots of gold acrylic paint (using the round bottom end of my brush as well as the larger round bottom end of a chopstick) to indicate the coat pattern of the giraffe. I also painted the horns, the tuft of hair at the end of the tail and the hooves gold. Obviously, a giraffe's coat is usually tawny with brown patches, and not white and shimmery gold, and it certainly doesn't have round patches, but – artistic license, right?
Finally, I sprayed my giraffe planter with clear glossy spray varnish to finish it off. This seals the acrylic paint, and it also makes it water-proof (depending on the varnish you use).
Make sure to let the paint dry before using the clay planter.
Grab your plant and place it into the body of the giraffe. Congratulations! You have made a beautiful giraffe planter. I hope you had fun!
Again, credit goes out to Ella Mattsson for providing the inspiration and foundation to this DIY clay planter!

P.S. – Plant Care
P.S. – Plant Care
Please keep in mind that this planter doesn't have a drainage hole to allow water to flow out of the pot. This is very convenient in terms of avoiding water spotting, but it also requires you to prevent any waterlogging which is harmful for your plants' health. To kill two birds with one stone, so to speak, it's best to place a succulent or a cactus into your planter. Succulents and cacti don't require as much water as other plants (in fact, they will usually die from overwatering), and they'll be happy when you water them every 2 to 4 weeks, or once the soil is dried out and the leaves start to shrivel.
Another great plant to put into your giraffe planter is an air plant.
Another great plant to put into your giraffe planter is an air plant.
Happy crafting!

My modelling clay giraffe is a fantastic model, isn't she?
BONUS TIP:
Did you know you can easily make your own air-drying modelling clay at home?
Did you know you can easily make your own air-drying modelling clay at home?
In a saucepan, combine 2 cups of baking soda with 1 cup of cornstarch. Slowly add 1 1/4 cup of water into the mixture. Stir. Heat up the mixture over medium heat, continuously stirring. Within the next 4–5 minutes, the mixture should thicken up. When it is almost the same consistency as playdough, the clay is done.
Remove from heat, and transfer the mixture onto a clean surface. Cover with a dish towel until cool. Once the clay has reached a comfortable temperature, use your clean hands to knead the clay until smooth. Proceed with the instructions above.
Store any unused air-dry clay, wrapped in plastic wrap or in a Ziploc bag, in another airtight container.
♥
Maisy


0 Comments